
31/08/2015


20/08/2015

18/08/2015
MUTTON ROGAN JOSH (KASHMIRI SPECIAL MUTTON CURRY )

Mutton Rogan Josh is a signature dish of Kashmiri Cuisine...here meat is cooked with spices and yogurt The use of Kashmiri red chillies gives a nice red colour to the curry.It derived the name from Persian words,Rogan means "oil"and Josh means "intense heat"..so Mutton Rogan Josh means mutton cooked in oil at intense heat.
INGREDIENTS
Mutton -500 grams (cut into medium pieces)
Oil-1/4 cup(Preferably mustard oil )
Dry Ginger Powder(Saunth) - 1tsp
Asafoetida or Hing-1 pinch
Cinnamon or Dalchini -1 one-inch
Cloves or Laung -4
Green Cardamom or Choti Elachi-2
Black Cardamoms or Bodi Elaichi -2
Black peppercorns-3
Black cardamoms-3
Kashmiri red chilli powder-2tsp
Fennel seed (saunf) powder-2 teaspoons
Coriander powder-1 tablespoon
Ghee or Clarified Butter -1tsp
Garam Masala Powder - 1tsp
Bay Leaf-1
Salt to taste
Yogurt -1/2cup ( Whisked )
Water -1 1/2 cup
METHOD
Marinate mutton pieces with 2 tbsp yougurt, salt for 2 hours.
Heat oil in a thick-bottomed pan. Add asafoetida, bay leaf,cinnamon, green cardamom cloves, black peppercorns and black cardamoms. Sauté till fragrant.
Add marinated mutton pieces and fry on medium heat till mutton pieces turn a nice reddish brown colour. Stir it to time that it does not stick to the pan.
Sprinkle a little water and continue cooking for on low heat. Add Kashmiri red chilli powder, fennel powder, dry ginger powder, coriander powder and salt.
Add remaining yogurt and 11/2 cups of water..mix and stir...Cover it with a lid and allow it to cook till tender, on low flame.
Open the lid..put garam masala, ghee and boil for 2 minutes.
Switch off the heat. ..Transfer to a serving bowl. ..garnish with mint leaves. .
Serve hot wih rice, naan pulao anything else what you want.
Traditional Kashmiri Rogan Josh has thin gravy and a thick layer of oil on top.


16/08/2015
1 MINUTE MICROWAVE COFFEE CINNAMON MUG CAKE

When you’re craving a single serving of a breakfast, snack or dessert, there’s nothing better than a microwavable mug recipe. Today I am going yo share 1 Minute Microwave Coffee Cinnamon Mug Cake.
Well, first you’ll need a cup. If you want it to puff up over the top of the cup, use a small one. Or if you want to dig into the cup, use a big one. It depends on you.
Preparation Time - 2 minutes
Baking Time -1minute
Serving-1
INGREDIENTS
3 tablespoons vegetable oil
3tbsp granulated sugar
5 tablespoons all purpose flour or maida
Coffee Sachet-1 or( Coffee Powder -1tsp)
1/2 tsp baking powder
Milk-3 tbsp
1/2 teaspoon vanilla essence
Cinnamon Powder -1 pinch
METHOD
In a microwave safe cup , add milk, oil,sugar and vanilla essence.....whisk these together with a fork.
Add the flour and cinnamon powder. .. mix until combined.If you do not mix well it will not rise up.

Place the mug in the center of the microwave and cook for 1 minute on High Power (means press Micro button then press 1 minute button then press Start button )
The cake should be risen and still slightly gooey in the middle.
If still undercooked for your liking, cook it further in 10 second..(timing is based on my 1200W microwave so your timing might vary)
Once cooked, remove mug from the microwave and allow to cool slightly. But be careful! The cup may be very hot.
Now enjoy your 1 Minute Coffee Chinamon Mug Cake...


14/08/2015
TIRANGA OR TRICOLOUR SANDESH (A INDIAN DESSERT WITH THREE COLOURS OF INDIAN FLAG)

Tomorrow 69th Independence Day will be celebrated throughout India. It is a great day for us as we got freedom on 15 th Aughust of 1947 from the British rule almost after 200 years of slavery.
It is celebrated with many cultural programmes, among them Flag Hosting is main...our beloved Tricolour National Flag is hosted by different people of through out the nation. I can easily recall the Independence Day ceremony of my school where after Flag Hosting we used to sing National Anthem and get sweets.
To celebrate this great day..I wanted to post something special. .and what else is better than a sweet dish to celebrate this occasion.
Being a Bengali..I love to eat Sandesh...and also make.All of you know that Sandesh (Shon-Daesh) is a sweet treat that can be made at any festival in a Bengali Household
To celebrate ours 69 th Independence Day I made Tiranga or Tricolour Sandesh. ..it is a layered sandesh mixing with Carrot or Gajar Sandesh, Chena or Paneer Sandesh and Pista or Pistachios Sandesh.
Firts we will learn how to make chena or paneer or ricotta cheese.
INGREDIENTS OF MAKING CHENA OR PANEER OR RICOTTA CHEESE
Milk-2ltr
Lemon juice or Vinegar-3tbsp (if required, add more lemon juice or vinegar to curdle the milk)
METHOD OF MAKING CHENA OR PANEER OR RICOTTA CHEESE
Take a heavy bottomed vessel, add milk
Bring it to boil and keep stirring to avoid burning of milk..
Once the milk comes to boil, simmer the gas, start adding the lemon juice and keep stirring( if required,add more lemon juice) cook for few seconds until the milk solids gets separates from the whey. Switch off the heat.
Pour this curdled milk to the already lined muslin cloth over a strainer,squeeze out all the whey water then rinse chena under the tap water as much as possible....if you do not rinse the chena or paneer proper. .you will get the smell of lemon while having it.
Now hang the cloth covered chena or paneer tap for 30 minutes. It will help to squeeze more water from chena or paneer...Now divide the chena into 3 equal portions.
To make Tricolour or Tiranga Sandesh. .we will start from bottom means green parts of our flag.
INGREDIENTS OF MAKING GREEN OR BOTTOM OR PISTA SANDESH PART OF TIRANGA OR TRICOLOUR SANDESH
Pista or Pistachios (without shell)-1 cup
Powdered sugar - 1 cup
Chena or Paneer or Ricotta cheese -1 Portion
Ghee-1tbsp
METHOD OF MAKING PISTA OR BOTTOM OR GREEN PART OF SANDESH.
Grind pista in a grinder to make a fine powder.
Heat ghee in a heavy bottomed vessel. .add powdered pista..and toss slightly. .it will change the colour.
Make a paste of chena or paneer with pista powder in a blender without adding water.
Put the sugar into a heavy bottomed vessel on slow flame and wait until sugar form a thick liquid...(Don't overcooked. .otherwise it will get caramelized ) ercooked. .otherwise it will get caramelized )
Add pista and chena or paneer paste and stir continously with a wooden ladle for 5 to 6 minutes or till the whole thing will be

Grease a pan or thali with some ghee
Now pour the this mixture in this prepared plate or thali.
Now level the mixture with a spatula.
INGREDIENTS OF MAKING CHENA OR PANEER SANDESH OR WHITE PART OF TIRANGA OR TRICOLOUR SANDESH
Chena or Paneer or Ricotta Cheese -1 Portion
Powdered Sugar-1/4cup
Rose Water-Few Drops
Cardamom Powder -1pinch
METHOD OF MAKING CHENA OR PANEER SANDESH OR WHITE PART OR MIDDLE PART OF THE TRICOLOUR OR TIRANGA SANDESH
Put the sugar into a heavy bottomed vessel on slow flame and wait until sugar form a thick liquid...(Don't overcooked. .otherwise it will get caramelized )
Grind the chena in a blender without water. .and add to the vessel...also add rose water and cardamom powder.
Sugar melts and becomes gooey, continue to cook on a low flame till it reaches a thick consistency. It also begins to leave the sides and looks crumbly.
Now pour this mixture on the pista chena or the green coloured mixture.
Level with a spatula.
INGREDIENTS OF MAKING CARROT OR GAJAR OR TOP OR SAFFRON PART OF THE TRICOLOUR OR TIRANGA SANDESH.
Chena or Paneer or Ricotta Cheese -1 Portion
Grated carrot:Of 2 carrots
Ghee: 1tbsp
Powdered Sugar: 1/4 cup
METHOD OF MAKING ORANGE OR TOP OR CARROTS OR GAJAR PART OF SANSESGMH.
Add ghee in a pan. .add carrots paste..toss carefully for a minute or two ...it will change the colour .
Make a paste of chena or paneer with carrots in a blender without water .
Put the sugar into a heavy bottomed vessel on slow flame and wait until sugar form a thick liquid...(Don't overcooked. .otherwise it will get caramelized ) ercooked. .otherwise it will get caramelized )
Add carrots and chena or paneer paste and stir continously with a wooden ladle for 5 to 6 minutes or till the whole thing will be thickened to a consistency that coats the ladle.
Now pour this mixture on the chena or white mixture.
Now level with a spatula.

Now allow this tricolour or tiranga sandesh to become cool...
Garnish with silver varak.
After it sets,slice this Tricolour or Tiranga Sandesh and serve.
Your Tricolour or Tiranga Sandesh is ready. ..now enjoy yours Independence Day with distributing this sandesh to yours freinds .

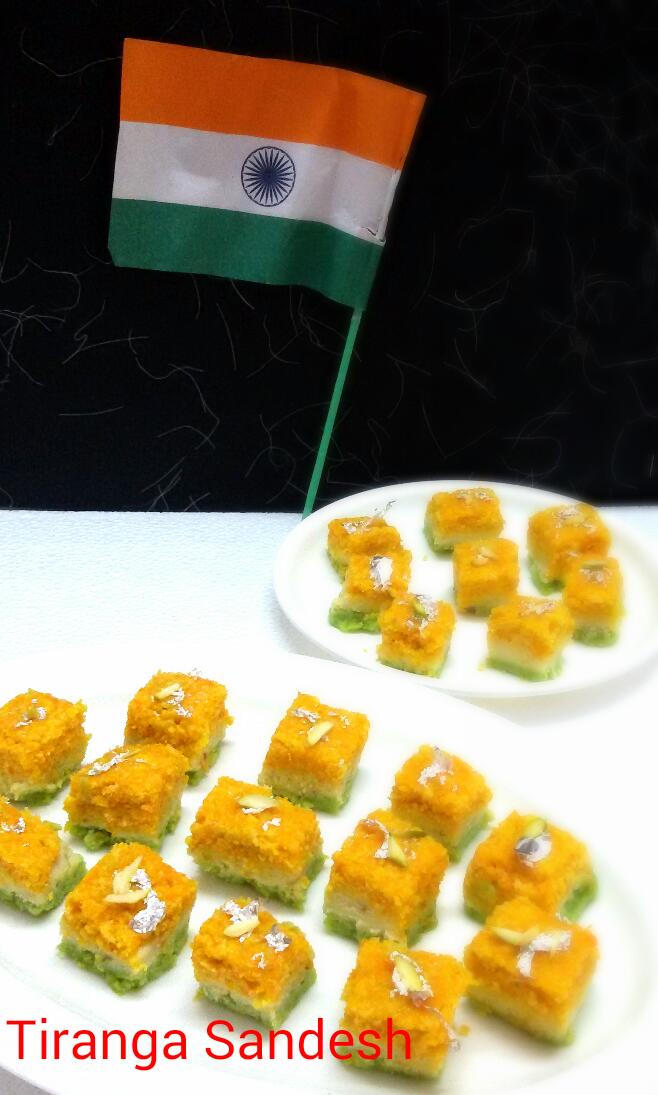
HAPPY INDEPENDENCE DAY
10/08/2015
MARBLE CAKE

This cake is for that time when you can't decide whether you want to make a chocolate cake or a vanilla cake, just combine the two and make a Marble Cake.It is the super moist, rich, buttery, and loaded with deep chocolate flavour. The marbling effect is created by placing the vanilla and chocolate cake batters in a cake pan, and then running a skewer or knife (do not stir) through the two batters to give it a marble effect. I personally prefer serving this cake plain as I want everyone to see the Marbling effect.But you can dust the top with powdered sugar or cocoa powder or cover with a Chocolate Ganache.
I baked my marble cake with round cake pan...you can use any regular cake pan according to your choice.
INGREDIENTS
All-purpose flour or Maida-1 1/2 Cups
Baking powder-1.5tsp
Granuled sugar-1 cup
Butter (softened not melted)-1/2 cup +1 tsp
Eggs-2 (if you want to avoid egg..then you can use
1 small tin (200ml) condensed milk.
Vanilla essence -1tsp
Milk-3/4cup
Cocoa powder-1/4cup
Baking soda -1 pinch
METHOD
Preheat oven to 350 degrees F or 175 C degree for 10 minutes.
Grease a 9 inch round cake pan with 1tsp oil.
Take a mixing bowl, combine flour ,baking powder, and baking soda...mix well and set aside.
Take a another bowl ,add butter and sugar..mix until creamy...add eggs(if you use condensed milk. .then add condensed milk) ..Add vanilla essence and milk...mix until a creamy texture.
Add flour mixture into this creamy mixture slowly...mix until smooth.

Reserve 1/2 cup batter; pour the remainder white batter into the greased pan.
Stir cocoa into the 1/2 cup reserved batter and mix well using a fork.


Drop by spoonfuls over top of white batter.

Using a knife, swirl the cocoa batter into the white batter to incorporate it in a marble effect.

Bake in preheated oven for 30 to 35 minutes, or Insert a toothpick to check. .if the inserted toothpick comes out clean then it is done
Remove from oven and let cool for 10 minutes..cut into slices..then serve and enjoy.


If you do not have both OTG or Microwave with onvection Mode..then you do not need to be worried. .you can bake it in Pressure cooker also.
FOR BAKING IN PRESSURE COOKER
Use a pressure cooker that's at least 3 litres, but 5 litres is a good size what I would recommend.
Remove the gasket (the rubber insulation thing) on the lid of your pressure cooker. This is an important step. You also do NOT need the whistle.
My pressure cooker came with a stand that goes at the bottom of the cooker pan. It distributes heat more evenly and is especially useful when baking in the pressure cooker. If you don't have, try to find a substitute. Maybe a small, thick steel plate would do the job as well.
It's better not to have the cake pan touch the bottom of the pressure cooker directly since that may cause the bottom of the cake to cook more rapidly.
you need to pre-heat the pressure cooker. For this, just place the lid (without gasket) on the pressure cooker (which should contain no water) and cook on high heat for 2 mins.
Now, keep the flame in low and place the cake pan filled with cake batter carefully inside the cooker. Close the cooker without gasket and weight,... cook for 45 minutes to be done.
Check it after 45 minutes by inserting a knife or toothpick in the centre of the batter, if it comes out clean, means it’s done, otherwise cook for some more time..but keep checking.
06/08/2015
PANEER MAKHANI (INDIAN COTTAGE CHEESE CUBES DIPPED IN TOMATO BASED RICH GRAVY )

Paneer Makhani is a well known Punjabi dish. Cubes of paneer are simmered in a creamy, tomato based gravy.Anyone who is familiar with Indian cuisine, should not miss
this rich flavourful dish.... a must try dish for all paneer lovers.
When we make Paneer Makhani at home,then the taste differs from one place to another because the spices might differ from region to region....even from one household to another.Some like to fry and brown the paneer, while some use it raw..today I am going to share the recipe of my version of Paneer Makhani, it is partially influenced by the recipe of great chef and also my favourite. Mr.Sanjeev Kapoor.
---------------------------------------------------------------------------------
Author -Moumita
Preparation Time -10 Minutes
Cooking Time-15 Minutes
Serving -4
----------------------------------------------------------
INGREDIENTS OF MAKING PANEER MAKHANI
Paneer (cottage cheese)-250 grams(cut into cubes )..you can use store bought or Homemade Paneer.
Oil-1/4 Cup
Green cardamom-4
Cloves-3
Cinnamon-1 inch stick
Garlic Paste-1tbsp
Ginger paste -1/2 tbsp
Green chillies paste-2tsp
Fresh tomato puree or Homemade tomato puree 1 1/2 cups
Salt to taste
Kashmiri red chilli powder -2 teaspoons
Coriander powder - 1tsp
Fresh coriander leaves chopped-1/4cups
Garam masala powder-1 teaspoon
Kasuri Methi or Dry Fenugreek Leaves -1/4 cup (chopped )
Cold milk-1/4cup(do not add hot milk..As for tomatoes the gravy is little bit tangy...for adding hot milk..gravy will be curdled.
Milk Powder -2tsp (optional )
Sugar -1/2tsp
Flour Mixture...1tsp (add 1tsp Flour into a bowl. .add 2tsp water...and mix..it will help to do the gravy more thick)
HOWTO MAKE TOMATO PUREE AT HOME
You will need to have 2 cups chopped tomatoes.
Combine all the chopped tomatoes along with 1½ cups of water in a pan...and boil on a high flame for 10 to 15 minutes or till the tomatoes are soft, while stirring occasionally.Cool ...peel the skin ...and blend in a mixer to a smooth mixture. Keep aside.
METHOD OF MAKING PANEER MAKHANI
Mix paneer cubes with salt and red chilli powder. .keep them aside for 5 minutes.
Heat two teaspoons oil in a non-stick pan. Add the paneer cubes and fry until light brown of both the sides .Remove from heat..and keep on absorbent paper...
Heat remaining oil in a another non stick pan...add bay leaf...cardamoms, cloves, cinnamon, garlic paste ,green chilli paste and ginger paste.. and sauté until oil gets separated.
Add tomato sauce...and cook to continue for 2 minutes. ..add tomato puree and cook for till it reduces slightly and raw smell of tomatoes goes away.
Add salt, remaining red chilli powder, coriander powder,kasoori methi and sugar and mix well...cook on low flame for 2-3 minutes.
Add milk powder.flour water mixture....and mix...add chopped coriander leaves and garam masala powder...mix..
Add milk ..mix properly...switch off the gas..
Serve hot with any Indian bread like Naan, Paratha,Tandoori Roti, Tawa Roti...or you have it with any rice dish...like jeera rice..
Vegetable pulao and many more.


04/08/2015
HOW TO MAKE WHIPPED CREAM USING FRESH CREAM


Whipped cream is a great topping for dessert, cake,cookies etc . In India it is not easily available in the market.Here we get low fat cream like Amul Fresh Cream. It is to be said that Whipped cream can not be made by using this low fat cream,but my daughter loves whipped cream on her cake,cup cake,cookies. .so whenever I make cake,cupcakes at home she wants all these with a dollop of Whipped cream.So I tried to make whipped cream by using Amul Fresh Cream at home and I succeed.Today
I am going to share step by step recipe of Whipped Cream at home by using Amul Fresh Cream.
Whipped cream is cream that has been beaten by a electric mixer, whisk until it is light and fluffy. All you need is two chilled bowl and a whisk (or electric mixer) , cold cream, some powdered sugar, and few minutes of your time.
If you use any dairy whipped cream or store bought whipped cream like Pillsbury Vanilla Whipped Cream .then you have to whip following this method...without whipping it can not be fluffy.
Preparation Time-10 minutes
Making Time -20 minutes
Servings -2cups Whipped Cream from 1 cup Fresh Cream
INGREDIENTS
Low Fat Cream -1 pack
Icing or Powdered sugar -2 tbsp(for home made Icing sugar. .follow the recipe link
HOMEMADE ICING OR CONFECTIONERS OR POWDERED SUGAR.
Vanilla essence-1tsp (if you want flavoured
whipped cream )
Bowls-(one big and other one comparatively smaller
Ice Cubes-7-8 pieces
Electric beater or Hand Whisk -1pc
METHOD
Put cream in refrigerator ...chill the cream for atleast 1 hour....as the cream has to be very cold for whipping.
Place the small mixing bowl and hand whisk into the freezer for 10 to 15 minutes, if you use electric beater then no need to put in fridge.

Fill the big bowl with ice cubes. .

Take out the small bowl and whisk from fridge. .put the small bowl in the ice cubes filled big bowl (as shown in the picture)

Take out cream from refrigerator.. ..pour the cream into a bowl through a strainer. .in that way, thick cream will be separated from thin or watery cream.

Pour the thick cream into the small bowl and start whipping the cream using a electric beater or hand whisk. .if you use electric beater. .do whipping your cream at medium speed..it will take 10 minute.....if you use hand whisk...then it will take 15 to 20 minutes to get a fluffy whipped cream. ..

after 5 minutes,add powdered sugar...and vanilla essence. .if you want you can add any other flavour of essence. ..or if you want your whipped cream without any flavour. .then do not need to add any essence.


For continuous 15 to 20 minutes you have to whip the cream. If your one hand gets tired...then whip with your another hand...or ask for somebody 's help at home...but do not stop whipping until it doubles in volume and forms soft peaks.


Now garnish your cake,cupcakes or any dessert with this whipped cream. ..or you can make chocolate mousse, pecan pie using this whipped cream and make your kids happy.

Note-
Whipped cream is a popular topping for fruit and desserts such as pie, ice cream, cupcakes, cake, milkshakes,waffles and puddings...make sure tour desserts are enough cold before topping with whipped cream. ..otherwise whipped cream will get melted. It is also served on coffee, Whipped cream is used as an ingredient in many desserts and as a filling for layer cakes.
Store any unused portion in an airtight container for up to 10 hours. When ready to use, rewhisk for 10 to 15 seconds.
Light, fluffy, melt-in-your-mouth whipped cream makes a delicious topping for desserts or cupcake or pie .... Unfortunately, it can not be used when you want cute piping designs that last throughout a day just for its softness...so use it as toppings. ..do not use it for piping to decorate a cake.
01/08/2015
CHENA PODA OR PANEER CAKE OR BAKED COTTAGE CHEESE

It is made with well kneaded homemade cottage cheese along with kaju or cashew nuts, raisins or kismis , ghee or clarified butter and sugar, then it is slowly baked till the brown color appears. Chhena poda is the only well known Indian dessert whose flavor is predominantly derived from the caramelization of sugar....and this makes this sweet dish different from other Indian desserts .
In traditional way it is slowly baked in earthen fire for few hours and then cooled down for hours before serving.These sweets are very famous through out Orissa.This is said to be the favorite dessert of Lord Jaganath.
Before starting the recipe, I would like to thank my neighbour cum freind Mona...she is a Odiya girl married with a Gujrati boy...one day she knocked my door...and gave this delicious sweet Chena Poda ..it was new to me...as Odisha is my neighbourhood state...but I have never heard about it...so first time I got a chance to taste it...and yes I can say it was delicious. I can assure...you will fall in love with once you have a bite of it.
Today we are going to learn how to make Chena Poda or Paneer Cake...you can bake it in OTG,or if you have Microwave with convection mode..then you can bake it in there also....or if you do not have both OTG or Microwave wih Convection Mode..then you do not need to be worried. .you can bake it in Pressure cooker also.
The main ingredient of this dish is chena or paneer or cottage cheese. ..so first we will have to make chena or paneer. ..to make chena or paneer we need to have...milk and lemon juice or vinegar.
INGREDIENTS OF MAKING CHENA OR PANEER OR COTTAGE CHEESE
Milk-2ltr
Lemon juice or Vinegar-3tbsp (if required, add more lemon juice or vinegar to curdle the milk)
METHOD OF MAKING CHENA OR PANEER OR COTTAGE CHEESE
Take a heavy bottomed vessel, add milk
Bring it to boil and keep stirring to avoid burning of milk..
Once the milk comes to boil, simmer the gas, start adding the lemon juice and keep stirring( if required,add more lemon juice) cook for few seconds until the milk solids gets separates from the whey. Switch off the heat.

Pour this curdled milk to the already lined muslin cloth over a strainer,squeeze out all the whey water then rinse chena under the tap water as much as possible....if you do not rinse the chena or paneer proper. .you will get the smell of lemon while having it.
Now hang the cloth covered chena or paneer tap for 30 minutes. It will help to squeeze more water from chena or paneer.

Make sure you do not drain it for too long and the chena does not get too dry. It should be moist enough to knead it smoothly.
Now you chena or paneer or cottage cheese are ready...now we will make Chena Poda or Paneer Cake by using this homemade Chena or paneer.
INGREDIENTS OF MAKING CHENA PODA OR PANEER CAKE
Home made chena or paneer-:1and1/2cup(approximately )
Granulated Sugar:1cup (add normal sugar in a blender, blend it on medium speed for 10 -15seconds)(if required add more )
if you have more or less chena..then just adjust sugar quantity according to the above chena and sugar measurements
Raisins(chopped)-2tbsp
Cashew nuts(chopped)-2tbsp
Green cardamom powder-1/2tsp
Sooji or Semolina -1tsp
Baking powder:1/2tsp
Ghee or Clarified Butter-1tbsp
For Caramelizing :
1 tbsp sugar
1 tbsp ghee or clarified butter
METHOD OF MAKING CHENA PODA OR PANEER CAKE
In a big plate, take homemade Chena or paneer...knead it very well til you found no lumps

Add Suji and powdered sugar and rest of the ingredients.....mix it well....mash it thoroughly using hands just like a soft dough.
To get a caramelized effect on the top, apply a tsp. of ghee to the baking tin. Sprinkle 1 tsp. of sugar on the tin. Hold the tin with pot holder slightly above gas stove for few minutes to melt the sugar. Spread the melted sugar evenly.

Then pour the chenna mix over the caramelized sugar.
FOR BAKING IN OVEN
Preheat oven of 180 degree C 350 degree F for 10 minutes. Then put the chena mixed baking tin in oven and bake it for 45 minutes or Insert a toothpick to check.... if the toothpick comes out cleanthen it is done. Cool it for 2 to 3 hours and then turn it upside down. Slice and serve. It stays fresh for a week in the refrigerator.
FOR BAKING IN PRESSURE COOKER
Use a pressure cooker that's at least 3 litres, but 5 litres is a good size what I would recommend.
Remove the gasket (the rubber insulation thing) on the lid of your pressure cooker. This is an important step. You also do NOT need the whistle.

My pressure cooker came with this stand that goes at the bottom of the cooker pan. It distributes heat more evenly and is especially useful when baking in the pressure cooker. If you don't have, try to find a substitute. Maybe a small, thick steel plate would do the job as well.
It's better not to have the cake pan touch the bottom of the pressure cooker directly since that may cause the bottom of the cake to cook more rapidly.
you need to pre-heat the pressure cooker. For this, just place the lid (without gasket) on the pressure cooker (which should contain no water) and cook on high heat for 2 mins.
Now, keep the flame in low and place the aluminium vessel with the cheese batter carefully inside the cooker. Close the cooker without gasket and weight,... cook for 30 minutes to be done.

Check it after 30 minutes by inserting a knife or toothpick in the centre of the batter, if it comes out clean, means it’s done, otherwise cook for some more time. (Mine took 30-35 minutes)

Cool it for 2 to 3 hours and then turn it upside down. Slice and serve. It stays fresh for a week in the refrigerator.


Subscribe to:
Posts (Atom)